Search This Blog

Thursday, 28 July 2011

Countdown to the Jane Austen Festival 2011

With just over seven weeks to go to the Grand Regency Promenade in Bath, I am beginning to feel the first stirrings of panic.


Last year I spent so long working on Robert's costume, that I had no time to make my own, so consequently I ended up looking like Stigitha of the Dump!
  

This year I want to look smart and well turned out, and the plan is to make a new dress, but if I don't have time, I will concentrate on the spencer and hat or bonnet.  

I was making a blue muslin drawstring dress, using Sense and Sensibility's 'Elegant Lady's Closet' pattern, but it's not quite right, so I have now started a calico toile using the S&S 'Regency Gown' pattern, which is for a back-fastening dress.
 
I'm still not happy, and will have to do the usual re-jigging!  
As Robert will now be able to have the time off work, we will both be heading down to Trowbridge together, so that means that I now have to make his new trousers as well as my costume.  

I have the pattern, Kannick's Korner Men's Fall-Front Trousers...
The pattern pieces have been cut, and I have started to put them together in calico...we still need to find some decent fabric to make the actual garment, which isn't easy in Lincoln!

Time to panic, methinks!  What I need is a plan of action...OK, where to begin???? :-O

Saturday, 16 July 2011

Here's Some I Started Earlier...

Whilst sorting out my sunbonnets, I kept ignoring a green carrier bag that contained projects that I'd made a start on but never completed.
The Green Bag

Today I actually inspected the contents and realised that there were two North Yorkshire bonnets half done, an unpiped soft bonnet, and a piece of striped coffee-coloured fabric that had piping and tucks sewn in, but not in any sunbonnet style.  
The partially made bonnets

This I put to one side.  The red soft bonnet has all it pieces constructed, and all I need to do is put it all together...
Red uncorded bonnet
Also with the red bonnet was another piece of fabric that had a brim corded and nothing more...I will have to decide what to do with that one, later.

The two North Yorkshire bonnets have had their brims corded, and are cut to the basic shape...these will need lining and gathering tape, as well as ribbon ties and perhaps a bow to finish them off...

Looking at what I have here, I notice that some of them do not have enough fabric available to make the ribbon ties, so I will definitely have to get creative in order to finish them!

For sunbonnets, I have fabric aplenty...pink flower print, apple print, and strawberry print...almost makes me want to have a cream tea among the flowers, butterflies and bees in the garden (if I had one!)
Flowers, apples, and strawberries

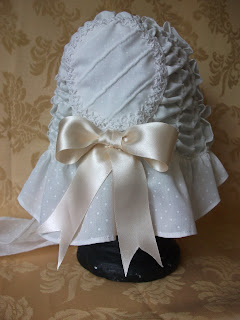
Finally, the coffee stripe fabric that I put to one side.  Inspiration suddenly came to me...another Empire/Regency bonnet...a confection of coffee and cream with ribbon and lace added (now I'm thinking of gateaux!!)  I think this will be the next bonnet, before I start on either the green or white ones!!


Opening an Etsy shop to sell the odd creation seems to be growing into something more...I wonder where it will lead me...?


Wednesday, 13 July 2011

A Bonnet For Myself

Last week I began work on a new bonnet...for myself.  

I decided to make this one with a stiffened brim, so I worked out the shape with paper, then when I was happy with it transferred the design to pelmet stiffener (or whatever it's called!), cut it out...then set it aside.


Next I took my fabric, two layers together, transferred the bonnet shape then stitched the outside edge.  Then came two rows of piping cord...(normally, I would buy a thick cord and unravel it for a smooth look, but this time I wanted the cord to show through as I wasn't going to gather it).


The next step was to mark the diagonal lines and sew in the rows of piping. 


It was beginning to look good when I suddenly realised...I'm going to have trouble getting the last couple of rows of piping in!  OOPS!


Plan B...forget first attempt, grab some more fabric and start again!  This time marking in from the edge to allow for edging piping, then starting with the diagonals!


If I had struggled on with the first attempt, the words of my old needlework teacher would be ringing in my head:  That's not good enough...!  So I just had to start again...

Empire of Grace

That's it!  I've finally done it!  I've posted my bonnets and opened my Etsy shop...Empire of Grace...  http://www.etsy.com/people/EmpireofGrace?ref=si_pr

Three Empire/Regency-style bonnets, and two of the Lincolnshire sunbonnets have been posted so far, and it's the green bonnet that has generated the most views so far.

I still have to sort out Shop Policies, and a few other things, and the postage rates need to be looked into properly so that I can ammend the amounts, then it will just be a case of make more items and post them!

(I wonder if I'll be able to sell anything??)


Lincolnshire sunbonnet

Back of Empire/Regency bonnet

Saturday, 11 June 2011

Forthcoming Etsy Shop


The decision to look into setting up an e-bay account to sell my bonnets, led me to spending an afternoon perusing similar wares.  

I'm afraid I was a little disappointed with what I found, and the prices charged, and said as much on Facebook.

Then a friend suggested I check out Etsy, which I did, and I was please with what I saw there...quality items at decent prices.

Well, I have now registered and am in the process of setting up my own Etsy shop to sell my Regency/Empire bonnets, as well as my Victorian sunbonnets...so watch this space (as they say)...


Sunday, 5 June 2011

Green Corded Bonnet

Having made a cream spot corded bonnet which presented me with one or two little problems, like realising that a Victorian Lincolnshire sunbonnet and a Regency corded bonnet are constructed in different ways, I thought that this time I would get it right.  Wrong!


The back of a sunbonnet is made of a horseshoe-shaped piece of fabric, whereas the backs of the Regency bonnets all appear to be round, but with various designs from puffs to gathers.
The first mistake I made was to cord the crown fabric the same way I would for a sunbonnet, which left me with no alternative but to make a horseshoe-shaped back piece.  

Now I had to find a way to disguise this...but how?  Then I hit upon the idea of making a round corded piece to sew onto the back, but abandoned this because it looked so wrong.

Whilst browsing some books looking for ideas for something else, I noticed the use of puffed lengths of fabric used as trimmings on gowns and bonnets.  That was the very thing I was looking for!  

Here is the end result...what do you think?


Wednesday, 18 May 2011

Fall-Front Trousers


Preparing for last years Jane Austen Festival in Bath was a very stressful time, because I was trying to make a costume for Robert, as well as a new spencer for myself (my ivory satin spencer split across the back!)

A tailcoat pattern had been purchased, so I began work on it in calico only to find that nothing matched up right, or the instructions were sadly lacking, so I collected together all the images of extant garments I could find to guide me...and bought more calico.

The Festival drew ever nearer, and I still had not started on trousers, so I set to using patterns from Norah Waugh's The Cut of Men's Clothes, as quickly as I could.  The fall-front was worked out, but I was having problems with the back and fit.  As it was still unfinished on the day, we had to cheat...big time!....but we got there and had a great day...


Back home, I unpacked the costumes and vowed to find a suitable pattern.  The pattern I purchased from Nehelinia Patterns www.neheleniapatterns.com was Kannik's Korner Man's Trousers...

I will blog about my progress with this pattern later, but I can tell you now that I am impressed by the in-depth instructions, explainations and options that come with it.